MATRIUX
 INTRODUCTION
- It is a fully featured security distribution based on Debian consisting of a powerful bunch of more than 300 open source and free tools that can be used for various purposes including, but not limited to, penetration testing, ethical hacking, system and network administration, cyber forensics investigations, security testing, vulnerability analysis, and much more.
- It is a distribution designed for security enthusiasts and professionals, although it can be used normally as your default desktop system.
- With Matriux, you can turn any system into a powerful penetration testing toolkit, without having to install any software into your hardisk.
- Matriux is designed to run from a Live environment like a CD / DVD or USB stick or it can easily be installed to your hard disk in a few steps.
- Matriux also includes a set of computer forensics and data recovery tools that can be used for forensic analysis and investigations and data retrieval.
Website : http://www.matriux.com/
Download Latest Matriux : http://www.matriux.com/index.php?page=download
Download Latest Matriux : http://www.matriux.com/index.php?page=download
MATRIUX


LOGIN WITH DEFAULT USERNAME PASSWORD
- You can try these 3 usernames
- root
- matriux
- tiger
And Password is " root " ( without quotes ) for all the usernames.


LIVE DESKTOP OPENED

CLICK ON MATRIUX DISK INSTALLER
- As you click on the " Matriux Disk Installer " , it ask you for the administrative password.
- Enter ' toor ' and click ok .
- See the below image for more details -

MATRIUX DISK INSTALLER
- Now the Matriux Disk Installer started and it shows a message that says you have to create atleast two partition manually to perform the installation .
- The two partitions are -
- One Swap partition
- One blank partition ( ext2, ext3,ext4,) and it should be atleast 6gb free space .
- See the below image for more details -

OPEN GPARTED
- Now to create partition manually , there is a pre-installed tool in the Matriux known as " Gparted " , which is used to created partition manually .
- To open gparted goto > System > Administration > Gparted

CREATE PARTITION TABLE

CREATE PARTITON TABLE
- Click On Apply .
- See the below image for more help -

CREATE EXT2 PARTITION
- To create ext2 partition right click on the unallocated space and click on New option.
- As you click on new option a windows will open from where you are going to give the size of the partition and other settings .
- See the below image for more details -

CREATING SWAP PARTITION
- Same step as above but here you have to choose File System as linux-swap .
- See th below image for more details -

CREATED PARTITION ThROUGH GPARTED
- Here you can see we have created partition temporarily .
- Now to make it permanent , we have to apply the changes .

APPLY PENDING OPERATIONS
- Now click on apply button.
- See the below image for more details -

ALL OPERATIONS SUCCESSFULLY COMPLETED

CHECK PARTITIONS
- Now open console and check your partitions are created or not through fdisk -l command.
- See the below image for more details -

MOUNT PARTITION
- Now you have to mount that partition which have more space .
- And here we have only one partition which have more than 6GB space , so we are now going to mount that partition .
- See the below image to see how we can mount the /dev/sda1 partition.

CHOOSE THE PARTITON FOR INSTALLATION
- Now once your partition is mounted , click on the matriux disk installer again .
- It will pop up window with the Partition that we mounted.
- Now click OK .
- See the below image for more details -

INSTALLING GRUB
- Now it ask you to install Grub or not .
- In my case , I selected Yes .
- See the below image for more details

CHOOSE THE DISC FOR GRUB INSTALLATION
- Now it will ask you to choose the partition where you want to install the Grub .
- See the below image for more details -

CREATING PERSONAL ACCOUNT
- Enter the name of your personal account .
- For example : In this case i have entered hackingDNA as a account name .
- See the below image for more details -

ENTER LOGIN NAME
- Here you have to enter the login name .
- In my case i have entered hDNA as a login name .

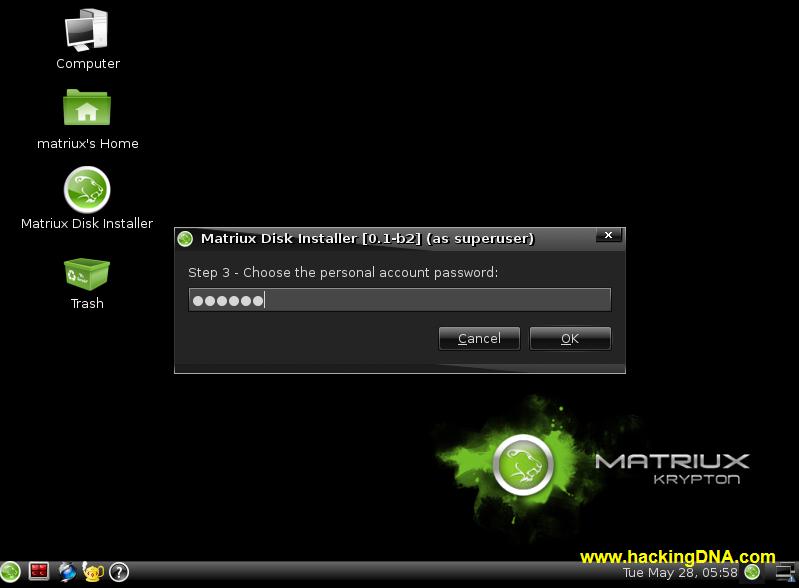
PERSONAL ACCOUNT PASSWORD
CONFIRM PASSWORD

CHOOSE ROOT ACCOUNT PASSWORD

CONFIRM ROOT PASSWORD

SELECT LOCALE

VERIFICATION
- In this step press Yes .
- See the below image for more details -

FINAL INSTALLATION
- Final step - You system is installing now , it will take few minutes till then take some break
- See the below image it will look like this in the final step .

CONGRATULATION MATRIUX INSTALLED
- Now restart the system.

GRUB
- Remember you choose Yes for the grub , here it is your grub .
- See the below image -

MATRIUX LOGIN FOR HACKINGDNA
- Enter your password and press Log in button .
- See the below image for more details -

MATRIUX DESKTOP
- Contratulation , you successfully reached here .
- See your Desktop in the below image .

- Thank you for reading this tutorial.
- I hope this tutorial will help you a lot in many situtation like -
NOTE : THIS IS FOR EDUCATIONAL PURPOSE ONLY !! I M NOT RESPONSIBLE FOR ANYTHING YOU DO
Thanks


0 comments:
Post a Comment